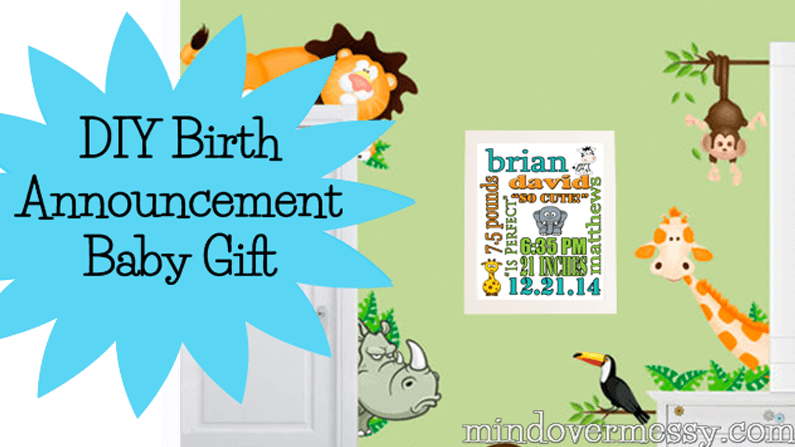
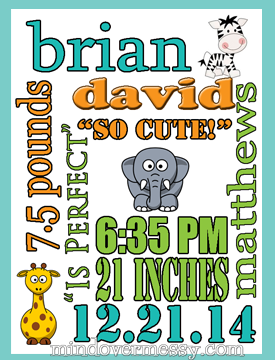
About five years ago, my friends and family seemed to go through a baby boom during which time I went to many a baby shower and many first visits to the new arrivals. I began making these baby announcement posters because I wanted something to bring to the hospital or the first visit that was special, but was not an outfit or toy. Not that I don’t love tiny clothes and toys, but I had already given my gifts at the baby showers and wanted something else so I didn’t meet the new babies empty handed. I found this idea on Pinterest, and have been making them ever since! I love taking the important details from the birth announcement and turning them into a heartfelt and personalized present. It’s so cute to hang in the nursery and later makes a great keepsake for the kids when they are old enough ask how tiny they were and how much they weighed.
If you have access to Adobe Photoshop Elements, using the downloadable template below will give you a great starting point to personalize a budget-friendly, professional-looking present. I used to create these in Microsoft Publisher, but find it much easier to use a Photoshop-type program. If you do not have Adobe Elements, they do offer a free 30-day trial which is how I got started.
To make this cute poster, all you need is:
- The baby’s name, length, weight and date of birth (which most people put these days in their announcement emails and on Facebook).
- Two quotes–I love to take something the new parents said about the birth and add it to the print if possible–in this case “so cute” and “is perfect.”
- Access to Photoshop Elements
- One thick piece of paper like stationary or scrapbook paper that will still fit in your printer.
- An 8×10 frame.
- Free clip art from Google if you are using a different theme. If you know the colors of their nursery, even better!
1) Download this template: Baby Poster.
Save the file to your computer and open it in Photoshop or Adobe Elements. The file will be a larger size than your final print in order to keep the words sharp. If you start with the words at the 8×10 size, they will print fuzzy. Starting with the larger size and reducing it later works best.
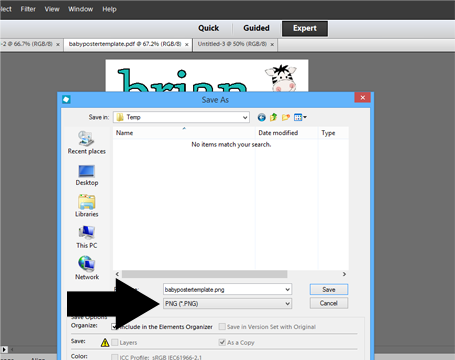
2) Once you are finished making this your own version by clicking in the text boxes and changing the words and numbers, you will be ready to save it. Save the file as a “PNG” file. To save as a PNG file, choose “Save As,” name it and choose PNG from the drop down. It will ask you PNG Options, choose “Interlaced.”
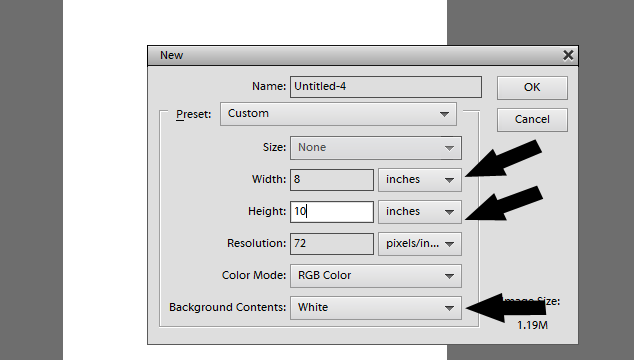
3) Next you’ll want to make this a size that will fit a frame. I chose to put it in an 8×10 sized frame. To do this, open a new document in Elements as the size 8×10. Go under “File–New–Blank File.” Change the drop down to inches and make it 8×10 with a white background.
Once you have your new document, place your PNG file on it. Under “File” on the menu bar, choose “place,” and open the document you just saved. Once it is placed, go to one of the corners and drag the file until it fits nicely with a little white space around all the edges. Always drag from a corner so it does not alter your text as it does when you drag from the top or bottom.
4) Before you print, save and close all other files that are open in Elements so they do not print too and waste ink (save the original as an editable, PDF file in Elements so that you can make changes later if you want).
Printing on a more heavily weighted paper (I bought mine as a single sheet at Michaels), really makes the words stand out in the frame and will make this gift look like you bought it on Etsy. You may want to test it on regular paper first to ensure you have it exactly as you want it.
5) Cut the edges of your paper slightly to fit in the frame and you are all set.
I made this one for the latest arrival to a member of our family and she loved it! I have also heard you can find pillows like this and it got my wheels turning. With this envelope pillow tutorial from The Happy Housie, and my Iron-On tutorial, this would make an adorable pillow to be placed on a rocking chair in the nursery!
I would love to see what cute combinations you can come up with.

 Welcome! Our modern lives can be so hectic that it is so helpful to find easier ways to get a healthy meal on the table, meditate even if the kids are loud, and stay active any way that we can fit it in. This blog is dedicated to making Mindful Living Easier.
What’s up, I log on to your blog like every week.
Your humoristic style is awesome, keep doing what you’re doing!